If ever there were a Matt's Blog Post that was worthy of a quick prologue, this is it! With over 4000 words, tons of original pics, a few gifs, multiple movie references, even more jokes that won't land, and even a demo video, this post (unintentionally) serves as a metaphor for how long-winded building a Partscaster can be. So, if simply reading through a post of this length isn't for you, then Partscastering probably isn't either! This build took 5 months and that's 5 months of limited practice in lieu of researching, buying, and physically working on whatever came next. While I certainly enjoy the build process, playing a completed build is by far my favorite part. Honestly, without the incredible team of luthiers at The Music Gallery, I probably would just be buying stuff off the rack and modifying it. Alright, enough pro-logging, LET'S GO!

In this edition of Matt’s Blog, I’m going to cover in tedious, over-bearing, nuanced detail, mind you, my latest Partscaster build! If you’ve chatted with me in the store there is a good chance I have bored you with man-splanations surrounding my various ventures down Partscaster Way. Well, get ready for one in written form!
This project was born out of a project-ruining mistake by the company that built the neck. I won’t mention their name because “unless you have something nice to say” or whatever…. I won’t use them again as a simple email could have avoided an entirely infuriating and ridiculous situation but what do I know! I ordered 1 and 7/8" nut width to accommodate nylon strings. I received 1.650". Womp womp. Time to make some lemonade, I guess!
I wanted a Roasted Maple Neck this time. The mill had some great stuff on hand and they picked a stellar piece. I'd call it a Medium-Roast with the straightest grain I have seen in years! I sent them a Brazilian Kingwood Fingerboard slab from my wood-stash (procured from Shabby Chic). This is an interesting wood with lots of color variation and a Janka Hardness Rating of 3340, right around where the most cherished Ebony species sit. This wood is EXCEPTIONALLY hard and supposedly makes for a great fingerboard material.

I always provide frets due to a nickel allergy I developed about 5 years ago. I sent a set of Jescar EVO 47094 frets to the mill. These frets are made of copper and titanium. They are extremely durable, don’t sound as bright or brittle as stainless steel, and have a light gold color. Best of all, they are hypo-allergenic and contain no nickel whatsoever!

The other details about the neck are as follows…
- Roasted Maple Material
- Brazilian Kingwood Fingerboard
- Chunky C Neck (.880 to .970)
- Jescar EVO Frets 47094
- 14” Fingerboard Radius
- Reversed Tele Headstock
- 1.650” Nut Width
- Clay Dots, Front and Side
- Truss Adjust Behind Nut
- 10mm Tuner Holes
- 25.5" Scale Length
- Unfinished (I finished it with Tru-Oil)

The neck I received was/is exceptionally nice and worthy of being used, it’s just not what I ordered. I figured I’d order a body for it and after a bit of consideration, I realized I was missing a tremolo in my collection. I did some research and stumbled upon Warmoth's Strat/Tele Hybrid body, reminiscent of a model Fender released as a Limited Edition through their Parallel Universe Line.

I went with Warmoth since I could configure the body, pickups, and tremolo to my liking. It’s an Alder body, Strat shaped, with a front panel Tele-style or "Hot Dog" control cavity. It has 3 pickups, though I had the bridge pickup routed for a Tele-shaped pickup. It’s also routed for a Vintage Style Tremolo, not a Tele-style bridge. I asked them to pick me a lightweight piece of wood, which they happily did… for like, $40 extra bucks.
Then the waiting game…
Realizing the Supply Chain difficulties and my need/desire for hypo-allergenic parts (there’s that nickel allergy again!), I decided to find the parts quickly. When it comes to metal parts, I order Black, Aluminum or Brass Hardware due to the nickel allergy. I have already spent a fair amount of time and money sussing out parts that are fine for me to touch, so I go with what works.
A couple of years ago, I procured an aluminum Rock Rabbit control plate with an interesting configuration. It's Pot - Angled Switch - Pot. This orientation is now a must-have for me. I modify plastic hot-dog-shaped cavity cover blanks with a Dremel tool to copy the hole placement.

I have had people inquire 'why the strange control plate layout?' and for me, it's all about the order of operations. I play with the volume the most, switch pickups often, and play with the tone control the least. Angling the switch is a no-brainer once you experience it and there is no going back! Also, in visiting the Rock Rabbit Website, I discovered they now make Black Hardware! Not just black though, they use Cerakote as the coating! Any of you that are into firearms are likely familiar with this stuff. If I didn't already have a bunch of these blank plastic plates on hand, I'd already have one of these on order!

A pair of the black Chicken Head Knobs was another easy choice. These knobs weigh NOTHING, and not only provide their player with a ledge to quickly knock the volume up or down onto but also a visual cue for where your volume is actually at! Imagine that! Also, I have two Ziplock bags full of them so I got that going for me... which is nice. *slowly nodding.

I already had a set of Kluson Revolution Tuners in black for a Reversed Headstock (in other words, Left-Handed Tuners) in my backup parts bin since Stew Mac closed them out for $50. I was going to use them when other tuners started failing but this neck is a perfect fit for them.

Ugh... tremolos. So many options, sizes, shapes, materials... sigh. I'm typically a Tele-Guy, so tremolos are somewhat foreign to me. After some research, I discovered that I needed to order the tremolo parts individually to get exactly what I wanted without buying components twice. So, that's the Saddles, a Plate, a Block, the Springs, a Claw, and an Arm. I found a Kluson Vintage Tremolo Plate in Black (The Kluson KVTPB) along with a Kluson Brass Tremolo Block (KVSBB). The Brass Block sweetens things up, acoustically and since I play sitting on the couch most often, it's my go-to choice.

The saddles are from Allsound Store on Reverb and are also… duh, duh, duuuuuuhh! (Orchestra hit) made from brass. These are available in 3 sizes and I ordered mine slightly narrow to reduce "cross saddle chatter," a concept that I believe I invented in order to feel special. Basically, the saddles don't touch each other. Many six-saddle designs have the saddles fighting for real-estate on the trem-plate. I thought this would eliminate that and it did. Hopefully, it adds something to its performance. Ooh, can't wait to prove that one!

Everything arrived quickly and assembling the tremolo was actually quite fun! I didn’t find the right trem bar yet but I did order a Floyd Rose Brass Tremolo Claw.

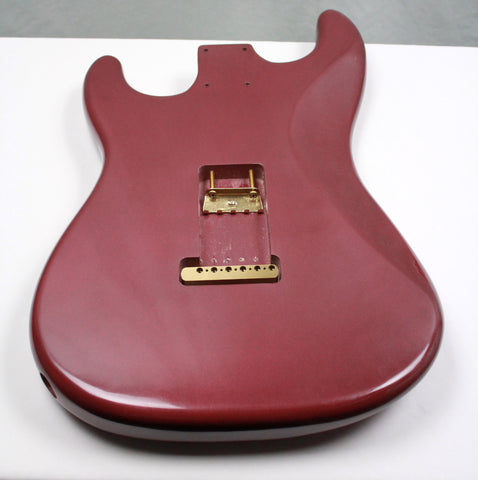
After investing a considerable portion of my life in the decision, and putting together the mock-up below, I settled on Burgundy Mist as the color. I find myself drawn to that color on the Fender Custom Shop Wall here at the shop so, that's that! I procured a rattle can of Gracey’s Nitro Lacquer, along with their Polaris White for the undercoat, and some sealer. I had an extremely pleasant exchange with their Answerer of Reverb Inquiries and would definitely recommend their rattle cans for those of us without spray-ability.

6 long weeks had passed when Warmoth emailed me a tracking number. The body arrived just a couple days later. Like a kid at Christmas, I tore that box apart and was very pleased with the quality of wood, the weight, and the sanding on the body as it was ready to take a finish. Warmoth got all the details right, another bonus! I immediately (as in within 2 minutes of having the box open) handed all the finishing stuff to {NAME REDACTED} and thus began the long, hard finishing process. I totally forgot to get pics of the raw body but it was rather uninteresting, visually. While the finish was getting sprayed, I moved on to the rest of the items I’d need to finish off the build.
Again, after wasting an embarrassing amount of time thinking about guitar pickups (seriously, it got problematic for a minute), I came across an old Fralin Split Blade bridge pickup that I damaged. I asked our tech Pete Flynn if he could fix it and he did! Sweet, decision made! I still had 2 more pickup routes to fill, though. The Noiseless Fralin pickup had me chasing other noise-free single coil sized pickups, as well, with the intention of making this an A+ Studio Guitar.

I tend to play a Strat dirtier than a Tele so noise-free pickups are a plus. As a big fan of Dimarzio Pickups, particularly the Area T’s, I combed over their website and landed on the Virtual Vintage 54 Pro (or DP408B) with Black (of course!) covers for both the neck and middle. An hour or so of watching youtube demo's convinced me I found what I was looking for. I ordered them directly from Dimarzio's website as they were out of stock everywhere.

With the pickups selected, I had to figure out a way to make the wiring process more difficult. Ultimately, I wanted the neck and bridge combo as a possibility, but also all three pickups on. Pete Flynn suggested a Push/Pull control that turns the bridge pickup on or off. That way I can get both the desired sounds with only 1 push/pull. Thanks, Pete! So I ordered a Linear 250K Volume Pot, an Audio Taper 250K Push/Pull pot, and a Fender 5-Way Switch.
I got a Warmoth Hybrid Strat Pickguard for the guitar in 1 Ply Black. I modified its shape after receiving it to look more like the F-Hole or Shorty or Merle Pickguard that I tend to put on all my builds. I contacted them about just making me a custom guard but they said they couldn’t. Fine, I'll do it myself!

Other small but crucial pieces included a switch tip, output jack and some sort of jack plate. I chose a Forney Custom Double Helix Flat Top pickup switch tip in Jet Black. This anodized aluminum switch tip has a set screw on it AND it looks like a large knurl Tele Dome Knob... SOLD! Not only does it look cool but it should also serve as an elegant solution to the age-old problem of the shrinking, and thusly falling off, Tele switch tip. I also ordered their anodized aluminum Elektro Socket for the output jack. It also looks cool, is lightweight, and helps keep less of the cable poking out of the side of the guitar.


I went with a Pure Tone Output Jack. I read about these a few months back and was looking for a reason to try them. They have dual grounds and positive tips, ensuring constant contact. They are also available in black!

I have found 2 sets of strings that agree with my skin. They are the D'Addario Half Round Set, marketed as a Nickel Free Option, and the D'Angelico Electrozinc Strings. I love them equally for different reasons. The Half Rounds for their insane durability and the Electrozinc for their warmer richer tone, and an easier feel on the fingers. I'll be going with the D'Addario's for the inaugural stringing but will try the Zinc's next.

Working with nitro sucks so I don’t expect anyone to be able to knock out a perfect job with a few spray cans. But NAME REDACTED did an AMAZING job and this guitar looks beautiful! Yes, there were multiple problems along the way that involved blobs, uneven coating, sanding issues… but that's nitro for you! However, I am thrilled with how it turned out, regardless! The body was handed back to me on Friday, January 21. Hopefully, things would be quick and easy from here on out... but I know better than to believe that!

I can't wait to get this thing wrapped up! Only like, 30 more things to do...

She got dumps like a truck. - Sisqo
Order of operations becomes very important during assembly, I mean, it's important the whole time but I tried to minimize redundancies as much as possible. Before the neck could go on, I had to mount the tremolo to the body. The bridge needs to be centered and straight so we can get the neck centered and straight. I didn't do a great job with this step on the other Strat I built years ago, so it never played as well as it could have. The routes/holes/tolerances on the Warmoth Body were great, however. I used a thin round file to lightly sand the tremolo holes to remove the finish they accrued during the finishing process. From there, I installed the tremolo, moving slowly and carefully, making sure it was lined up correctly. Finally getting to see this black and brass trem rig on the burgundy mist finish guitar was truly inspiring!

I then installed the Floyd Rose Brass Claw mentioned earlier. Thankfully the holes for the claw were already drilled so this was fast and easy. When I went to put the trem springs in, I discovered that I didn't have any! As a self-professed Tele Guy, I only have myself to blame. No worries, the last few steps were accomplished within the same day of receiving the body back so a little (more) patience won't hurt.
Fast Forward to the next day after work and I had 3 black tremolo springs ready to install! This was an easy process, though stretching out these springs is always rough on the hands. It took just a minute to seat the springs in and they look killer! The black springs up against the brass claw components look equal parts classy and bada$$!
Next, came mounting the neck. I attempted to fit the neck in the pocket as-is but it wasn't even close. After 30 minutes of carefully sanding the walls of the neck pocket, I attempted to put the neck in... and I got it in, but probably shouldn't have. It's definitely not straight and there is no side-to-side wiggle room. So, I carefully slipped the neck out and used a Dremel tool to widen the treble side corner of the neck pocket. A little more breathing room there should allow for better alignment. With the holes in the body already drilled, I used them as a guide for a pilot hole for one screw in the neck just to hold it in place. I checked the alignment again and with things looking good, I drilled the rest of the pilot holes in the neck, then put in their screws. With the neck on, it's time to move on to the nut!

I plan on using the tremolo often so I selected a nut material that is supposed to be conducive to heavy trem usage. Tusq XL from Graph Tech is "impregnated with PTFE". From the Fluorotec Website: PTFE is an incredibly versatile material with a wide variety of applications, though it's perhaps best-known for its non-stick properties. Apparently, adding this to the mix during the manufacturing process permanently lubricates the nut. Sounds like the right material for this guitar!

I had George use his skills to size and shape the Tusq XL Blank and then our Plek Machine to slot the nut correctly for the strings. A Plek Cut Nut is as good as it gets so the action will be fantastic!

The Nut looks and feels fantastic, plus, the slots are perfect for my preferred gauge of string. This should bode well for its performance!
George also scanned the whole guitar in the Plek Machine and we learned that there was a pretty bad rise on the higher frets. It was bad enough that bending from the 15th fret on was going to result in choked out notes so, like all my guitars, it got Plek'ed!

The frets are now perfect. Even though the electronics weren't installed yet, I could wait no more: it was getting played that night!
With the nut installed and the guitar strung, it was time to play what I will refer to as Mr. Burgundy from here on out, for the 1st time! I like to test a neck and body with no electronics or pickguard to get a solid read on what they are doing. This neck and body seem to mesh well with another so far. I logged a couple of hours warming up to Mr. Burgundy and it revealed some issues that my OTHER guitars suffer from, especially misaligned necks. So far, I am happy with its performance.
A couple of things jumped out at me. 1st was the built in reverb tank, thanks to the tremolo springs. A quick SPLAT! of reverb emanates when I got the springs to jump. With no back cover on the guitar, I found this to be fairly noticeable. I am thrilled with how the neck performs in all regards. It feels close to Fender's 54 Strat Neck which is on the big side for a Strat. George dialed in the radius via the Plek which actually goes from 13.1" to 13.3" (ordered to be 14" radius) and I'm enjoying how easy grabbing chords is. Things are shaping up nicely at this point so let's hope the electronics are as impressive as the neck and body...
On to installing the electronics. I joke that when I use a soldering iron, it looks as though the T-1000 from Terminator 2 did the job. That's the guy made of molten metal, btw, who sprays the stuff all over the place when injured.
FACT: the best references warrant the most explanation.
Anywho! I didn't want to make a mess of the install. Plus, just putting the components in the control plate made my hands break-out with a horrible allergic reaction, so I leaned on Pete Flynn yet again. He mounted the pickups directly to the body per my request, did the push/pull on the 250k CTS push/pull pot acting as the tone control for turning the bridge pickup on and off, the Master Volume with a Linear 250K CTS Pot, and a 5-way switch. I prefer a linear volume control as its taper works better with my approach to cutting volume. With the electronics installed and functioning, I finally laid eyes on a completed Mr. Burgundy for the 1st time!

With Mr. Burgundy complete after 5 months, it's finally time to PLAY THE THING! Honestly, that's the part I like the LEAST about Partscaster-ing: It is a massive, focus-stealing distraction that consumes time I could have spent practicing/playing. So, finally getting to plug a new build in is just about the most rewarding experience I have... experienced (lol) at least when it comes to a new guitar! Take a listen, why don't you? And please like and Subscribe to my channel while you're at it!
The Fralin Split Blade Tele bridge pickup is not quite as biting as most Fender Pickups. They have a slightly dulled top-end thanks to the dual split blade design. Most stacked/noiseless "single-coil" pickups exhibit this compared to the pickups they are imitating.
The Dimarzio Virtual Vintage 54 Pro in the neck and middle positions are bright, woody, and articulate. They have a nice round, powerful quality in positions 3 and 5 while the quack and jangle in positions 2 and 4 are really sweet! Position 2 is a bit bright for my tastes but 4 is absolutely perfect!
The "Add Bridge Mod" is handy and will come in handy at times. It definitely does a convincing Tele Middle Position, which was my main goal. I am digging all 3 pickups on as well. My last Strat had the Fralin Blender control and I much prefer this arrangement. I highly recommend it on any 3 Pickup guitar, though I prefer the 2 Potentiometer design since I never utilize 2 tone controls.

Putting the project to rest feels great and so did that first chord/lick! However, setting it up, tweaking it, and really dialing it in can easily take a month as the instrument settles in with tension on it for the 1st time. Overall, I'm satisfied with the guitar. It weighs in at 7 lbs 10 oz which is ok for a Strat but by no means a featherweight like my other guitars. I love the look of the Brazilian Kingwood Fingerboard. The neck plays incredibly well with absolutely no complaints. Having both the nut cut and the frets crowned by the Plek Machine all but guaranteed a buzz-free experience... at least when I'm playing well! It plays great, sounds great to my ears, is perfect for recording thanks to the noiseless pickups, looks cool, and has plenty of conversation starters built right in. I'm excited to have this one complete and part of the collection!

Partscastering can be long and tedious, especially depending on where you start in the process. A kit with matching parts is a very different experience than starting with wood blanks or chopping down a tree. However, if you enjoy a project that absolutely requires patience, a detail-oriented approach, money, and could easily take months to years (4 years and counting is my record), then try one! If hunting down parts that will fit sours your stomach, then maybe start by ordering a kit that comes with everything you'll need to complete a build. I will say that if you aren't the kind of person who "enjoys the journey", don't get into this. You'll waste time and money, then more than likely dump a half-finished mess into some poor luthiers lap. Trust me, it happens here weekly.
I have built 9 guitars now and they do keep getting better but my critical eye is far more advanced than my luthier abilities. Much like my ability to write about guitar vs. playing guitar! This is why I still lean on some killer luthiers that I just so happen to work with. Pete Flynn handled the dirty work of finishing and electronics, along with a handful of other things that only more experience builders/luthiers know. So Mr. Burgundy has absolutely turned out better than any of my other builds, despite its rocky start as Project: Failure!
UPDATED: 05/20/23
Even when you think you have the perfect vision for a guitar, you really don't know if you hit the mark until you use it for its intended purpose. A few hours in the studio showed me a couple components were working against me. I switched the brass trem block for an aluminum one which shed about 6 to 7 ounces of weight off the guitar. I also swapped the bridge saddles out for some black, anodized aluminum saddles from Forney Custom on Reverb. It was a little muddy to my ears and the aluminum parts helped with articulation and bring the weight down to about 7 lbs.
This edition of Matt's Blog was written by Mathew Jenkins who believes that every guitar is a partscaster.
Great post! I really enjoyed reading about your Partscaster build journey. It’s impressive how you turned a mistake into an opportunity with the neck and created a beautiful guitar. The choice of materials, like the Roasted Maple neck and Brazilian Kingwood fingerboard, shows attention to detail. The online guitar parts (https://faberusa.com/) you selected, including the Kluson Revolution Tuners and Fralin pickups, add to the overall quality of the build. The Burgundy Mist finish looks fantastic. Well done on your meticulous work!
WOW! A great sounding Partsacaster – and giving Setzer a run for his money there…!
@Steve Phillips, that’s exceptionally kind of you!
Thanks for the info! Think I might quit guitar after seeing you play